A B C D E F G H I J K L M N O P Q R S T U V W X Z

docker-compose

English version below

Docker Compose kann immer dann verwendet werden, wenn mehrere Docker-Container gleichzeitig gestartet und beendeet werden sollen und untereinander kommunizieren müssen. Ein klassischer Anwendungsfall ist eine Web-App mit Datenbankanbindung. Hier bräuchte man einen Container mit der App und einen Container mit der Datenbank. Außerdem muss die Datenbank einen Port anbieten, über den die App und die Datenbank kommunizieren können.

Docker Compose ist nicht automatisch in Docker integriert und muss zusätzlich installiert werden. Eine Anleitung dafür gibt es hier.

Docker-Compose file

Um Docker-Compose zu verwenden, muss man ein Docker-Compose-File anlegen. Dieses heißt in Regelfall „docker-compose.yml“ und ist im YAML-Format verfasst. Die Informationen aus dem docker-compose-file ersetzen oder ergänzen Informationen aus einem Dockerfile.

Grundlegende Struktur

Prinzipiell folgt das docker-compose-file folgender Struktur:

version: number-of-docker-version
services:
  service-1:
    property-1:
    property-2:
      - list-if-needed
  service-2:
    property-1:
    property-2:

Die Datei enthält im Prinzip eine Auflistung aller gewünschten Dockercontainer und der Einstellungen, die für diese vorgenommen werden sollen.

Im folgenden werden einige mögliche Einstellungen näher erklärt.

container_name

Mit container_name wird angegeben, wie der zu erstellende Container Docker-intern heißen soll. Wird diese Eigenschaft nicht angegeben, wird ein automatischer Name vergeben.

version: 3
services:
  my-container:
    container_name: my-container

image

Durch image kann der Name eines DockerHub-images angegeben werden. Dieses wird dann als Basis für den Container genutzt.

Dockerfile-Äquivalent: FROM

version: 3
  services:
    my-neo4j-service:
      image: neo4j

build

Mit build kann ein eigenes Dockerfile angegeben werden, das für das Erstellen des Containers verwendet werden soll. Dieses Argument hat zwei Unterpunkte: Mit context wird der Pfad zu dem Ordner angegeben, in dem das Dockerfile liegt, mit dockerfile dessen Name.

version: 3
  services:
    my-container:
      build:
        context: .
        dockerfile: Dockerfile

volumes

volumes gibt Festplatten an, die im Dockercontainer erstellt werden sollen. Wie auch im Dockerfile gibt es hier die Möglichkeit, die Festplatten mit Ordnern auf dem Host-System zu synchronisieren.

Dockerfile Äquivalent: VOLUME

version: 3
  services:
    my-container:
      container_name: my-container
      volumes:
        - '.:/app'
        - '/app/node_modules'

ports

Wenn Ports spezifiziert werden sollen, die an das Host-System weitergeleitet werden, geht das über ports. Hier werden die Ports wie im Dockerfile angegeben.

Dockerfile Äquivalent: PORTS

version: 3
  services:
    my-container:
      ports:
        - "3000:3000"
    my-neo4j-container:
      image: neo4j
      ports:
        - "1234:4000"


English version

Docker Compose can be used whenever multiple Docker containers need to be started and stopped simultaneously and need to communicate with each other. A classic use case is a web app with database connection. Here, you would need a container with the app and a container with the database. Also, the database needs to provide a port through which the app and the database can communicate.

Docker Compose is not automatically integrated with Docker and needs to be installed additionally. Instructions are available here.

Docker Compose file

To use Docker-Compose, you have to create a Docker-Compose file. This is usually called „docker-compose.yml“ and is written in YAML format. The information from the docker-compose file replaces or supplements information from a Dockerfile.

Basic structure

In principle, the docker-compose-file follows the following structure:

version: number-of-docker-version
  services:
    service-1:
      property-1:
      property-2:
        - list-if-needed
    service-2:
       property-1:
       property-2:

Essentially, the file contains a listing of all the Docker containers you want to use and the settings to be made for them.

Some possible settings are explained in more detail below.

container_name

The container_name is used to specify what the container that will be created should be called internally in Docker. If this property is not specified, an automatic name is assigned.

version: 3 
  services: 
    my-container: 
      container_name: my-container

image

With image the name of a DockerHub image can be specified. This will then be used as the base for the container.

Dockerfile equivalent: FROM

version: 3
  services:
    my-neo4j-service:
      image: neo4j

build

Use build to specify a custom Dockerfile to use for building the container. This argument has two subparameters: Use context to specify the path to the folder where the Dockerfile is located, and use dockerfile to specify its name.

version: 3
  services:
    my-container:
      build:
        context: .
        dockerfile: Dockerfile

volumes

volumes specifies volumes to be created in the Docker container. As in Dockerfile, there is an option here to synchronize the disks with folders on the host system.

Dockerfile equivalent: VOLUME

version: 3
  services:
    my-container:
      container_name: my-container
      volumes:
        - '.:/app'
        - '/app/node_modules'

ports

If ports that will be forwarded to the host system are to be specified, this is done via ports. The ports are specified in the same way as in the Dockerfile.

Dockerfile equivalent: PORTS

version: 3
  services:
  my-container:
    ports:
      - "3000:3000"
    my-neo4j-container:
      image: neo4j
      ports:
        - "1234:4000"

Docker, Nginx and Https

To set up https in a docker-nginx-service, follow this tutorial.

To use it, enter our email address and domain name. If NGINX is running in any other container than one called „nginx“ start that container instead of „nginx“ whenever needed.

The script mentioned can be used as it doesn’t do anything harmful. Explaination of the script:

#!/bin/bash

Defines language of script, only needed if running as a script (vs. directly on console)

if ! [ -x "$(command -v docker-compose)" ]; then
echo 'Error: docker-compose is not installed.' >&2
exit 1
fi

Checks if docker-compose is installed, not needed

domains=(example.org www.example.org)
rsa_key_size=4096
data_path="./data/certbot"
email="" # Adding a valid address is strongly recommended
staging=0 # Set to 1 if you're testing your setup to avoid hitting request limits

Sets variables for later use important

    • domains = our domain
    • rsa_key_size = Size of the key (In general: The larger, the safer, but larger key will also use more computing time. Could also be set to 2048)
    • data_path = Path to data for certbot, path should be the one declared in docker-compose.yml
    • email: our email-adress
    • staging: The validation server has certain limits as to how many certificates may be registered etc. 0 is default here. Setting to 1 can be useful if planning around and expecting to call the server multiple times, since thresholds are a bit higher in some cases
if [ -d "$data_path" ]; then
read -p "Existing data found for $domains. Continue and replace existing certificate? (y/N) " decision
if [ "$decision" != "Y" ] && [ "$decision" != "y" ]; then
exit
fi
fi

Asks for permission to delete existing certificates and exists if it is not allowed. not needed

if [ ! -e "$data_path/conf/options-ssl-nginx.conf" ] || [ ! -e "$data_path/conf/ssl-dhparams.pem" ]; then
echo "### Downloading recommended TLS parameters ..."
mkdir -p "$data_path/conf"
curl -s https://raw.githubusercontent.com/certbot/certbot/master/certbot-nginx/certbot_nginx/_internal/tls_configs/options-ssl-nginx.conf > "$data_path/conf/options-ssl-nginx.conf"
curl -s https://raw.githubusercontent.com/certbot/certbot/master/certbot/certbot/ssl-dhparams.pem > "$data_path/conf/ssl-dhparams.pem"
echo
fi

Checks if there are already existing ssl-configurations for nginx, if not downloads the recommended parameters from certbot github page. Not 100% needed but handy

echo "### Creating dummy certificate for $domains ..."
path="/etc/letsencrypt/live/$domains"
mkdir -p "$data_path/conf/live/$domains"
docker-compose run --rm --entrypoint "\
openssl req -x509 -nodes -newkey rsa:$rsa_key_size -days 1\
-keyout '$path/privkey.pem' \
-out '$path/fullchain.pem' \
-subj '/CN=localhost'" certbot
echo

Create dummy certificate so that nginx can start and retrieve the actual certificate important

    • docker-compose run runs a service (certbot) for one time only (so not running the whole setup, but only this one container)
    • –rm removes container when it is being stopped
    • –entrypoint specifies script that should be executed once the container is up. In this case the script is given in „“ right after the flag
    • openssl req Requests and generates a certificate
echo "### Starting nginx ..."
docker-compose up --force-recreate -d nginx
echo

Simply start the nginx container important

echo "### Deleting dummy certificate for $domains ..."
docker-compose run --rm --entrypoint "\
rm -Rf /etc/letsencrypt/live/$domains && \
rm -Rf /etc/letsencrypt/archive/$domains && \
rm -Rf /etc/letsencrypt/renewal/$domains.conf" certbot
echo

Delete the intermediate certificate. Therefore run the certbot container again as specified above and as the entrypoint delete all the certificates. important

echo "### Requesting Let's Encrypt certificate for $domains ..."
#Join $domains to -d args
domain_args=""
for domain in "${domains[@]}"; do
domain_args="$domain_args -d $domain"
done

Now requesting the actual certificate. This need some preparation. First construct domain-args variable out to add to the certbot-string (`-d domain`) later Not 100% necessary since we only have one domain

# Select appropriate email arg
case "$email" in
"") email_arg="--register-unsafely-without-email" ;;
*) email_arg="--email $email" ;;
esac

Checks if email is valid Not needed

# Enable staging mode if needed
if [ $staging != "0" ]; then staging_arg="--staging"; fi

Enable staging mode as explained above Not needed

docker-compose run --rm --entrypoint "\
certbot certonly --webroot -w /var/www/certbot \
$staging_arg \
$email_arg \
$domain_args \
--rsa-key-size $rsa_key_size \
--agree-tos \
--force-renewal" certbot
echo

Docker-compose command for getting the actual certificate important

    • certbot certonly runs command certbot only asking for a standalone certificate
    • webroot enables to get the certificate while the server is running (? this one is a little unclear to me)
    • next all the variables are written into the command
      • agree-tos agree to terms of service
      • –force-renewal renews the certificate even if it is not expired yet (Not sure why it is done, but also not harmful)
echo "### Reloading nginx ..."
docker-compose exec nginx nginx -s reload

Reload nginx important


Docker, nginx-proxy & SSL

If you want to enable SSL support for your docker project there is an easy way to go:

Requirements:

  • A domain name (without a domain name or an publicly available ip address it is not possible to enable SSL support via Let’s Encrypt)
  • A docker compose file (the one you use for your project – if you only use a Dockerfile without a docker compose file, it can be easily set up: just follow this instruction: Converting a Dockerfile to a docker-compose.yml)

Let’s assume your project’s folder structure is as follows:

(project root) /
├── Super cool project /
│   ├── index.html
│   ├── script.js
│   ├── style.css
│   └── Dockerfile
└── docker-compose.yml

And the content of your docker-compose.yml is like this:

version: "3.8"
services:
  super-cool-container:
    build: "./Super cool project"
    ports:
      - 80:80

All you have to do to enable SSL is to add 2 more services to this file and 1 volume and to delete all the publicly available exposed ports of your project’s container:

version: "3.8"
services:
  super-cool-container:
    build: "./Super cool project"
    ports:
      - 80:80
    environment:
      - VIRTUAL_HOST: super-cool.example.com
      - VIRTUAL_PORT: 80
      - LETSENCRYPT_HOST: super-cool.example.com
      - LETSENCRYPT_EMAIL: ssl-admin@example.com
 nginx-proxy:
    image: nginxproxy/nginx-proxy
    ports:
      - 80:80
      - 443:443
    volumes:
      - /var/run/docker.sock:/tmp/docker.sock:ro
      - ./nginx/certs:/etc/nginx/certs:rw
      - ./nginx/vhost.d:/etc/nginx/vhost.d:rw
      - ./nginx/html:/usr/share/nginx/html:rw
  nginx-proxy-companion:
    image: nginxproxy/acme-companion
    environment:
      DEFAULT_EMAIL: ssl-admin@example.com
    volumes_from:
      - nginx-proxy
    volumes:
      - /var/run/docker.sock:/var/run/docker.sock:ro
      - acme:/etc/acme.sh:rw
    depends_on:
      - nginx-proxy
volumes:
  - acme:

Obviously you should change the hostnames and email-addresses accordingly.

The nginx-proxy will now handle all incoming requests from the ports 80 and 443 and will redirect the requests to the containers automatically based on the hostname that was given in the request.

The nginx-proxy-companion on the other hand will just do all the ssl magic by automatically pulling new certificates for the containers when the certificate is going to expire.

Let’s assume your public ip address is 1.1.1.1 (which it is not in the most cases :-P) and your domain name is example.com and your projects domain name is super-cool.example.com.

If you try to reach your project by ip-address (1.1.1.1) it will give you an Error 503.

If you try to reach your project by just example.com (eventhough it might point to the right ip address) it will display an Error 503.

But if you try to reach your project by the domain name provided in your docker-compose.yml (so in this case super-cool.example.com) it will display the correct site.

Dockerfile


English version below

Ein Dockerfile ist der Grundbaustein eines Dockercontainers. In ihm wird festgehalten, was getan werden soll, wenn der Dockercontainer gestartet wird. Auf Basis eines Dockerfiles kann ein Docker-Image erstellt werden, mit dem dann ein Docker-Container aufgesetzt werden kann.

Aufbau eines Dockerfiles

Ein Dockerfile ist ein Textdokument, das mit dem Dateinamen „Dockerfile“ benannt ist. In diesem Dokument werden Befehle aufgelistet, die bei Start des Containers ausgeführt werden sollen. Dabei steht immer ein Befehl in einer Zeile und die Befehle werden von oben nach unten in der angegebenen Reihenfolge ausgeführt.

Basis

In den allermeisten Anwendungsfällen wird ein bestehendes Image als Basis verwendet und um weitere Befehle erweitert. Ein bestehendes Image aus dem DockerHub kann mit diesem Befehl eingebunden werden:

FROM image-Name

Zum Beispiel das Image für Neo4J:

FROM neo4j

Dieser Befehl sorgt dafür, dass Neo4J im Docker-Container „installiert“ wird.

Dateimanagement

Im Dockerfile lässt sich auch spezifizieren, welche Dateien im Container gespeichert werden sollen, und wo diese abzulegen sind. Mit dem Befehl WORKDIR wird das Arbeitsverzeichnis innerhalb des Dockercontainers festgelegt. Das heißt, das hier angegebene Verzeichnis ist der Ausgangspunkt für alle weiteren Dateien und Verzeichnisse. In diesem Beispiel wird als Arbeitsverzeichnis der Pfad „/app“ angegeben.

WORKDIR /app

Um Dateien in den Dockercontainer zu übertragen kann der Befehl COPY verwendet werden. Dieser kopiert eine Datei aus dem angegebenen lokalen Pfad in den angegebenen Pfad im Dockercontainer. Wenn man die Datei direkt in das Arbeitsverzeichnis legen möchte, kann man einen „.“ verwenden wie in diesem Beispiel:

COPY path-on-local path-in-container
COPY package.json .

Befehle ausführen

Mit dem Befehl RUN können Befehle innerhalb des Dockercontainers wie auf einer Kommandozeile ausgeführt werden:

RUN command
RUN npm install
RUN mkdir neuer-ordner

Festplatten

Festplatten („Volumes“) im Dockercontainer ermöglichen es, Daten innerhalb des Dockercontainers zu speichern, die auch dann bestehen bleiben, wenn der Dockercontainer heruntergefahren wird. Sie werden von Docker gesondert verarbeitet und abgelegt und daher beim Herunterfahren nicht gelöscht. Um eine Festplatte auf einem angegebenen Pfad zu erschaffen, wird der Befehl VOLUME genutzt.

VOLUME path-in-container

Dieser Befehl ist sehr praktisch, denn er kann genutzt werden, um eine Docker-Festplatte fortlaufend mit einem Ordner auf dem Host-System zu synchronisieren:

VOLUME host-path:container-path

Wenn man nun während der Container läuft eine Änderung im Ordner host-path vornimmt, wird diese Änderung in den Ordner container-path im Container übernommen.

Ports

Wenn eine Anwendung Informationen an einen Port sendet, der auch außerhalb des Containers erreichbar sein soll, so muss dies im Dockerfile angegeben werden:

PORT container-port:host-port

Die Ausgabe des Container-Ports wird dann an den entsprechenden Port des Hosts weitergeleitet. Die Portnummern müssen dabei nicht identisch sein.

PORT 3000:4000

In diesem Beispiel werden Informationen auf den Port 3000 an localhost:4000 weitergeleitet.


English version

A Dockerfile is the basic building block of a Docker container. It records what is to be done when the Docker container is started. Based on a Dockerfile, a Docker image can be created, which can then be used to set up a Docker container.

Structure of a Dockerfile

A Dockerfile is a text document named with the filename „Dockerfile“. This document lists commands that should be executed when the container is started. Each line contains one command and they are executed from top to bottom in the specified order.

Base image

In the vast majority of use cases, an existing image is used as a base and extended with additional commands. An existing image from DockerHub can be included with this command:

FROM image-name

For example, the image for Neo4J:

FROM neo4j

This command ensures that Neo4J is „installed“ in the Docker container.

File management

The Dockerfile also lets you specify which files to store in the container, and where to store them. The WORKDIR command is used to specify the working directory within the Docker container. That means, the directory specified here is the starting point for all other files and directories. In this example, the path „/app“ is specified as the working directory.

WORKDIR /app

To transfer files to the Docker container, the COPY command can be used. This copies a file from the specified local path to the specified path in the Docker container. If you want to put the file directly into the working directory, you can use a „.“ as in this example:

COPY path-on-local path-in-container.
COPY package.json .

Run commands

The RUN command can be used to execute commands inside the Docker container as if on a command line:
RUN command
RUN npm install
RUN mkdir new-folder

Volumes

Volumes in the Docker container allow you to store data inside the Docker container that persists even when the Docker container is shut down. They are processed and stored separately by Docker and are therefore not deleted during shutdown. To create a disk on a specified path, the VOLUME command is used.

VOLUME path-in-container

This command is very handy because it can be used to continuously synchronize a Docker volume with a folder on the host system:

VOLUME host-path:container-path

Now, if you make a change in the host-path folder while the container is running, that change will be reflected in the container-path folder in the container.

Ports

If an application sends information to a port that should also be accessible outside the container, this must be specified in the Dockerfile:

PORT container-port:host-port

The output of the container port is then forwarded to the corresponding port of the host. The port numbers do not have to be identical.

PORT 3000:4000

In this example, information on port 3000 is forwarded to localhost:4000.

EasyRDF: A PHP library designed to make it easy to consume and produce RDF

https://www.easyrdf.org/

Example

$foaf = new EasyRdf\Graph("http://njh.me/foaf.rdf");
$foaf->load();
$me = $foaf->primaryTopic();
echo "My name is: ".$me->get('foaf:name')."\n";

Requirements

  • PHP 7.1 or newer
  • The pcre extension (enabled by default)
  • The mbstring extension (usually available)

Features

  • Extensive unit tests written using PHPUnit
  • Built-in parsers and serialisers: RDF/JSON, N-Triples, RDF/XML, Turtle
  • Optional parsing support for: ARC2 and rapper
  • Optional support for Zend\Http\Client
  • No required external dependancies upon other libraries (PEAR, Zend, etc…)
  • Complies with the PSR-12 coding style
  • Type mapper – resources of type foaf:Person can be mapped into PHP object of class Foaf\Person
  • Support for visualisation of graphs using GraphViz
  • Composer compatible
  • Comes with a number of examples

Geovistory

https://www.geovistory.com/

New Features and Completly reworked Documentation

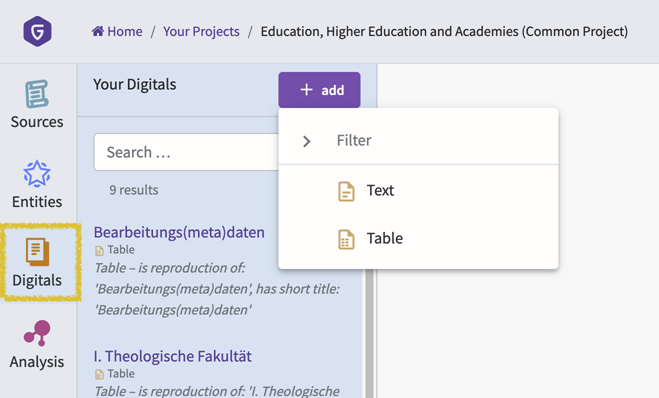
  • Improved organization of Digitals (Tables & Text), allowing the analysis of annotations and much more. See details.
  • Read-mode & edit-modefor a better overview of the data (shortcut: Shift + E). See details.

We have reworked our documentation and added a lot of content, such as sections explaining

Gephi Tool zur Netzwerkvisualisierung

Gephi Workshop EPFL @DH2020

Ressources: https://github.com/CultureAnalytics/DH2020

Git_Versioning Software

Git ist eine freie Software zur verteilten Versionsverwaltung.

Das bedeutet: Mit git können mehrere Personen auf ihren lokalen Rechnern an einem Projekt arbeiten, und ihre individuellen Arbeitsstände in einem zentralen online-Repository zusammenführen. git wird vor allem für Coding-Projekte verwendet, aber auch andere Anwendungszwecke sind theoretisch denkbar.

Prinzipielle Funktionsweise

Etwas vereinfacht funktioniert git so:

Online existiert ein Repository. Wenn eine Person am Projekt arbeiten möchte, lädt sie den aktuellen Stand des Projektes aus dem Repository herunter. Dieser Befehl wird auch „Pull“ genannt. Alle Dateien liegen nun als Kopien auf ihrem Rechner. Mit diesen kann sie arbeiten und sie verändern, löschen, oder neue Dateien hinzufügen. Wenn Person A damit fertig ist, lädt sie ihren aktuellen Arbeitsstand von ihrem lokalen Rechner in das Repository. Dieser Schritt heißt „Push“ . Die Dateien im Repository werden aktualisiert und Rechner und Repository sind nun auf demselben Stand.

Es können auch mehrere Personen gleichzeitig pullen und pushen. Dabei kann es zu Konflikten kommen. Zum beispiel dann, wenn Person A und Person B eine Datei bearbeitet haben. Beide pushen ihre Dateien. Nun würden zwei verschiedene Versionen der Datei existieren. Ist das der Fall, bietet git verschiedene Möglichkeiten an, die Dateien zusammenzuführen.

Branches

Eine weitere zentrale Funktion ist das Erstellen von Branches. Zu Beginn eines Projektes gibt es nur einen Branch: Den main-Branch (früher auch oft Master-Branch genannt). Hier sind alle Dateien gespeichert. Manchmal möchte man aber nicht an den „original“-Daten arbeiten, zum Beispiel, wenn man etwas ausprobieren möchte von dem man noch nicht sicher ist, ob es funktioniert. Dann kann man einen Branch erstellen. Das bedeutet: Alle Dateien aus dem main-Branch werden kopiert und man arbeitet erstmal an den Kopien weiter. Alle Pulls und Pushes passieren dann auf dem neuen Branch. Wenn man sich sicher ist, dass der eigene Code funktioniert, spielt man seine Änderungen aus dem Branch zurück in den main-Branch. Diese Zusammenführung der Branches heißt Merge.

In vielen Projekten ist es sinnvoll, den Zugriff auf den main-Branch zu beschränken und zuerst noch eine Kontrolle einzuführen. In diesem Fall kann man den eigenen Branch nicht einfach so mit dem main-Branch zusammenführen, sondern stellt erstmal einen Pull-Request. Das bedeutet: Man bittet den Besitzer des main-Branches darum, die Änderungen im eigenen Branch in den main-Branch zu übernehmen. Wird der Pull-Request akzeptiert, werden die Branches zusammengeführt.

Git verwenden

Klassischerweise wird git über die Kommandozeile verwendet. Dafür muss man die Software hier herunterladen. GitHub bietet außerdem ein Cheat-Sheet für die Kommandozeilenbefehle an: https://education.github.com/git-cheat-sheet-education.pdf

Für Windows gibt es auch die Möglichkeit, git über die Desktop-Anwendung Github Desktop zu verwenden. Diese bietet eine übersichtliche Oberfläche für alle Funktionen von git und kann hier heruntergeladen werden.

Wenn man Github Desktop mit gitlab verwenden will, dann muss man nach folgender Anleitung vorgehen: https://itnext.io/how-to-use-github-desktop-with-gitlab-cd4d2de3d104


Goenet Security Group in GWDG Horizon

Create and Manage Security Groups

You can create new security groups to provide certain servers with specific access. After login with the user credential, follow the steps:

    1. From the left menu bar, select Project→Network→Security Groups and then click “Create Security Group”.
    2. Determine a unique meaningful name (Ex. Goenet) and an optional description then click “Create Security Group”.

Once the security group has been created successfully, it will be shown in the list with an option to manage its security rules.

Manage Security Rules

You can add/remove security rules to/from a security group, in order to change the provided access. Click “Manage Rules” from the very right of the security group row. A form containing all defined rules will be shown. By default, all ports are opened for outbound connections and no inbound connections are allowed. As a result, you can see that it contains 2 Egress rules whit no limitation on IPs and ports.

    1. To add a new rule, click “Add Rule” on top-right of the form.
    2. To define Goenet rule, first select TCP protocol from “Rule” drop-down list.
    3. Leave the “Direction” field with the value Ingress (inbound connections).
    4. For TCP protocol select All ports from “Open Ports” drop-down list.
    5. Leave the “Remote” field with the value CIDR, and in “CIDR” field specify the GWDG/University’s IP range: 134.76.0.0/16. The default value “0.0.0.0/0” means from any IP (no protection) .
    6. Then click “Add” on bottom-right of the form.
Goenet Rule

Assign Security Group to Server

From the left menu bar, select Project → Compute → Instances and then click the small arrow on the very right of each instance row called “Actions”. After that select “Edit Security Groups” then click the “+” (add sign) of “Goenet” from Security Groups list. Then click “Save” on bottom-right of the form to apply the rules on the server.

Source:  Create and Manage Security Groups