Git ist eine freie Software zur verteilten Versionsverwaltung.
Das bedeutet: Mit git können mehrere Personen auf ihren lokalen Rechnern an einem Projekt arbeiten, und ihre individuellen Arbeitsstände in einem zentralen online-Repository zusammenführen. git wird vor allem für Coding-Projekte verwendet, aber auch andere Anwendungszwecke sind theoretisch denkbar.
Prinzipielle Funktionsweise

Etwas vereinfacht funktioniert git so:
Online existiert ein Repository. Wenn eine Person am Projekt arbeiten möchte, lädt sie den aktuellen Stand des Projektes aus dem Repository herunter. Dieser Befehl wird auch „Pull“ genannt. Alle Dateien liegen nun als Kopien auf ihrem Rechner. Mit diesen kann sie arbeiten und sie verändern, löschen, oder neue Dateien hinzufügen. Wenn Person A damit fertig ist, lädt sie ihren aktuellen Arbeitsstand von ihrem lokalen Rechner in das Repository. Dieser Schritt heißt „Push“ . Die Dateien im Repository werden aktualisiert und Rechner und Repository sind nun auf demselben Stand.
Es können auch mehrere Personen gleichzeitig pullen und pushen. Dabei kann es zu Konflikten kommen. Zum beispiel dann, wenn Person A und Person B eine Datei bearbeitet haben. Beide pushen ihre Dateien. Nun würden zwei verschiedene Versionen der Datei existieren. Ist das der Fall, bietet git verschiedene Möglichkeiten an, die Dateien zusammenzuführen.
Branches
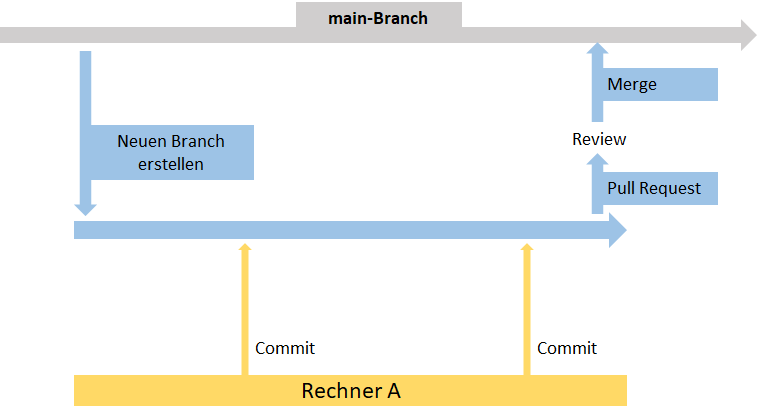
Eine weitere zentrale Funktion ist das Erstellen von Branches. Zu Beginn eines Projektes gibt es nur einen Branch: Den main-Branch (früher auch oft Master-Branch genannt). Hier sind alle Dateien gespeichert. Manchmal möchte man aber nicht an den „original“-Daten arbeiten, zum Beispiel, wenn man etwas ausprobieren möchte von dem man noch nicht sicher ist, ob es funktioniert. Dann kann man einen Branch erstellen. Das bedeutet: Alle Dateien aus dem main-Branch werden kopiert und man arbeitet erstmal an den Kopien weiter. Alle Pulls und Pushes passieren dann auf dem neuen Branch. Wenn man sich sicher ist, dass der eigene Code funktioniert, spielt man seine Änderungen aus dem Branch zurück in den main-Branch. Diese Zusammenführung der Branches heißt Merge.
In vielen Projekten ist es sinnvoll, den Zugriff auf den main-Branch zu beschränken und zuerst noch eine Kontrolle einzuführen. In diesem Fall kann man den eigenen Branch nicht einfach so mit dem main-Branch zusammenführen, sondern stellt erstmal einen Pull-Request. Das bedeutet: Man bittet den Besitzer des main-Branches darum, die Änderungen im eigenen Branch in den main-Branch zu übernehmen. Wird der Pull-Request akzeptiert, werden die Branches zusammengeführt.
Git verwenden
Klassischerweise wird git über die Kommandozeile verwendet. Dafür muss man die Software hier herunterladen. GitHub bietet außerdem ein Cheat-Sheet für die Kommandozeilenbefehle an: https://education.github.com/git-cheat-sheet-education.pdf
Für Windows gibt es auch die Möglichkeit, git über die Desktop-Anwendung Github Desktop zu verwenden. Diese bietet eine übersichtliche Oberfläche für alle Funktionen von git und kann hier heruntergeladen werden.
Wenn man Github Desktop mit gitlab verwenden will, dann muss man nach folgender Anleitung vorgehen: https://itnext.io/how-to-use-github-desktop-with-gitlab-cd4d2de3d104